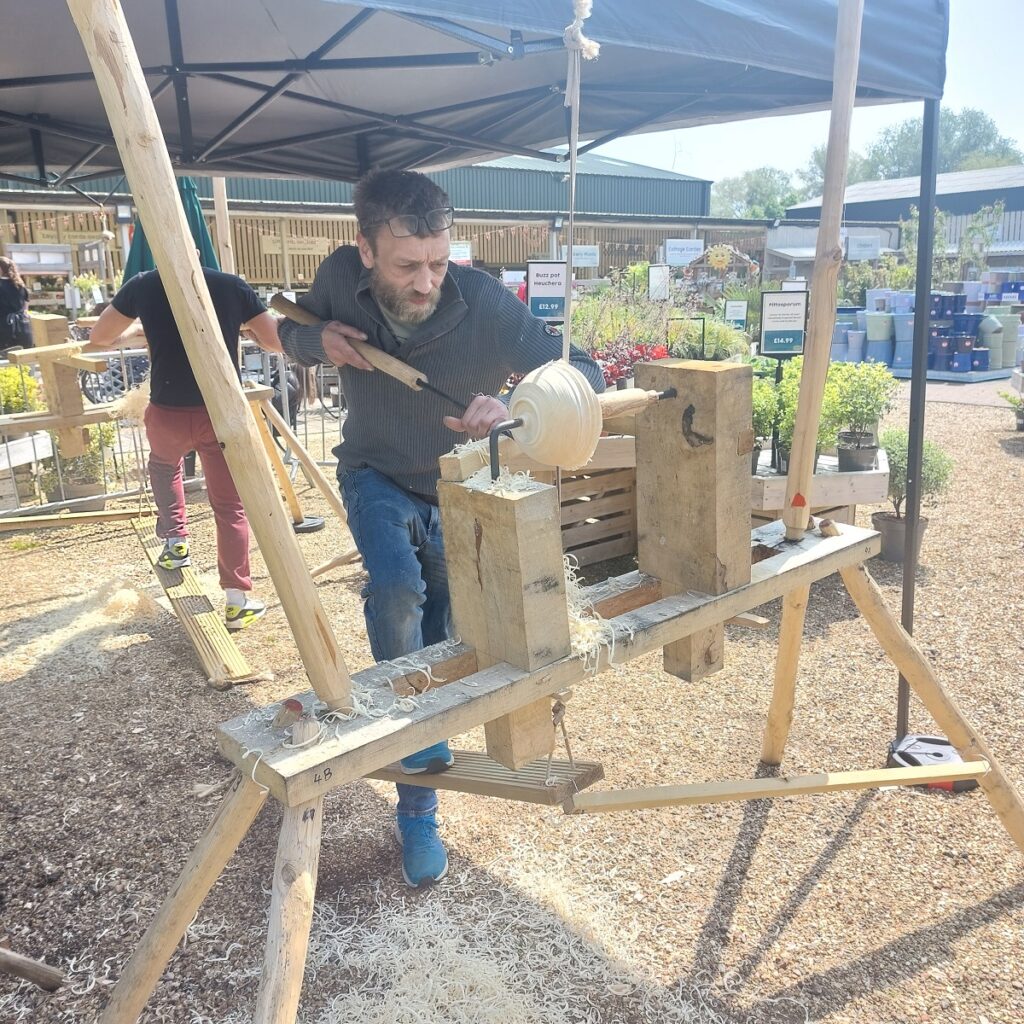
Creating your own tools and machinery is a tradition as old as human civilisation, providing a unique sense of satisfaction and achievement. Today, we are going to delve into this age-old practice by guiding you on how to build a pole-lathe, often referred to as a bowl-lathe.
The pole-lathe is a fascinating piece of equipment, combining basic principles of physics with the artisan’s touch to produce a wide variety of crafts, most notably wooden bowls and vessels. This craft dates back to the Middle Ages and continues to be cherished by woodworkers for its simplicity, functionality, and the tangible connection it creates between the artisan and the material.
Building a pole-lathe requires some investment of time and effort, but the outcome is absolutely worth it. Whether you are an experienced woodworker seeking to reconnect with traditional techniques or a beginner looking to embark on a new hobby, constructing a pole-lathe is an endeavor that rewards the craftsperson with a versatile tool and a gateway to numerous creative possibilities.
Throughout this guide, we will take a step-by-step approach to building a traditional pole-lathe. We’ll discuss the materials required, the design considerations, and the assembly process. We will also share tips and tricks to help ensure that your pole-lathe serves you well for years to come. Get ready to embrace this fulfilling journey into the realm of traditional woodworking. Let’s start building!
Components Needed to Build a Pole-Lathe
- Lathe Bed
Oak or ash are both excellent materials for the lathe bed. Ideally, the lathe beds should be from kiln dried stock, rather than green wood. The dimensions I recommend are:
Width: 1.5m
Depth: 20-25cm
Thickness: 60-80mm
- Headstock & Tailstock
Also known as poppets, oak, or ash is ideal for both headstock and tailstock.
The dimensions for the headstock are:
Height: 65cm
Depth: 20cm
Thickness: 10cm
The dimensions for the tailstock are:
Height: 50cm
Depth: 20cm
Thickness: 10cm
- Metal Centres: The bowl blank and mandrel are held between the headstock and tailstock using metal centres. I sourced mine from Adrian Lloyd, a superb bowl-turner and toolmaker.
- Headstock Tool Rest Support: A horizontal wooden arm supporting the tool rest attaches to the headstock. I have drilled holes along its top edge to adjust the tool stop.
- Wedges for the Poppets: When inserted into a slot in the poppet, these must be long enough to protrude on either side of the lathe bed for easier adjustments.
- Tool Rest: This is a simple piece of wood that supports the tools used to turn the bowl. A simple branch measuring 1.5m suffices.
- Tool Stop: This is a short piece of cylindrical wood with a nail through its centre. The nail allows the stop to be placed in one of the holes along the tool rest support.
- Upright Support for Bungee & Lathe Legs: I used sweet chestnut for the supports and legs, as it is lightweight and durable. Length of Legs: Approx 1.2m and Supports: 1.85m.
- Treadle: The treadle is used to power the lathe. I use a piece of decking about 1.5m in length. Some turners add a stabiliser to the treadle.
- Cord: Any durable cord will work. After trying many, my recommendation is the Chromnylon transmission belt.
Tools You Will Need to Build a Pole-Lathe
To build a pole-lathe, you will need a few commonly available tools:
- Circular saw
- Saw sledge
- Tape measure
- Pencil
- Adjustable bevel
- Drill/brace and bits
- Drawknife
- Chisel
- Froe
- Axe
- Shave horse
- Clamps
- Workbench
- Spirit level
- Hand saw
- Auger
- Tenon cutter
- Wooden maul
- Set square
- Metal ruler
How to Build A Pole-Lathe – The Lathe Bed
The pole-lathe bed holds most of the lathe components. Therefore, it must be robust and withstand the forces used in turning a bowl without flexing, rocking or tipping.
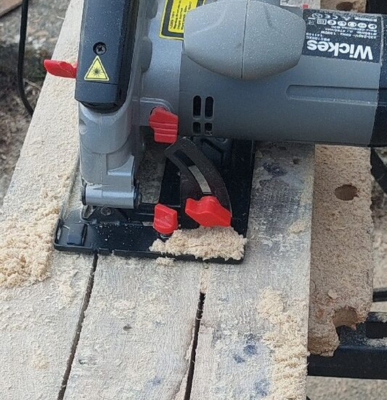
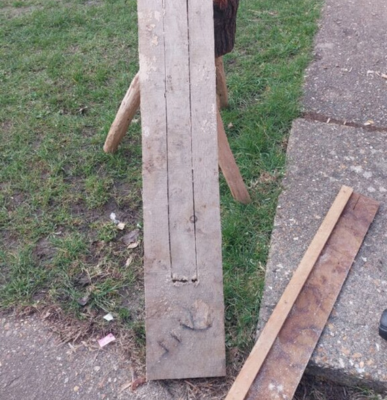
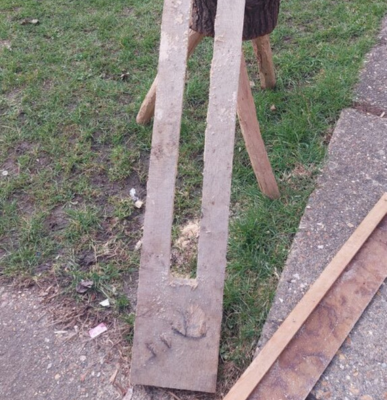
Step 1: Cut a 1m slot along the centre of the lathe bed.
The slot should be 1m long and 8cm wide. It should be located 25cm from each end of the lathe and run along its centre.
After marking out the position of the slot, you will need to drill a hole so the edges of the hole are within the marked area.
Then clamp the saw sledge parallel to the edge of the slot.
The sledge is simple to make if you don’t have one. This was made using a piece of hardboard and a baton. The baton provides a hard edge to run the circular saw against. The width of the sledge is simple to set. Run the saw along the baton, cutting the sledge to the correct width.
It is now easy to cut a straight line along the length of the lathe bed using a circular saw. Repeat this process for the slot’s other long side.
You may need to mark up the lathe bed on both sides, as your circular saw may not be able to cut all the way through in one go.
Now that you have completed the two long edges, it’s time to cut the short edges. You will need a drill and a relatively large drill bit to do so. Drill a series of holes almost touching across the two short edges of your slot. Final cuts to remove the wood from the centre can be completed with a sharp wood chisel.
Step 2: How to Build a Pole-Lathe – Pole-lathe Legs
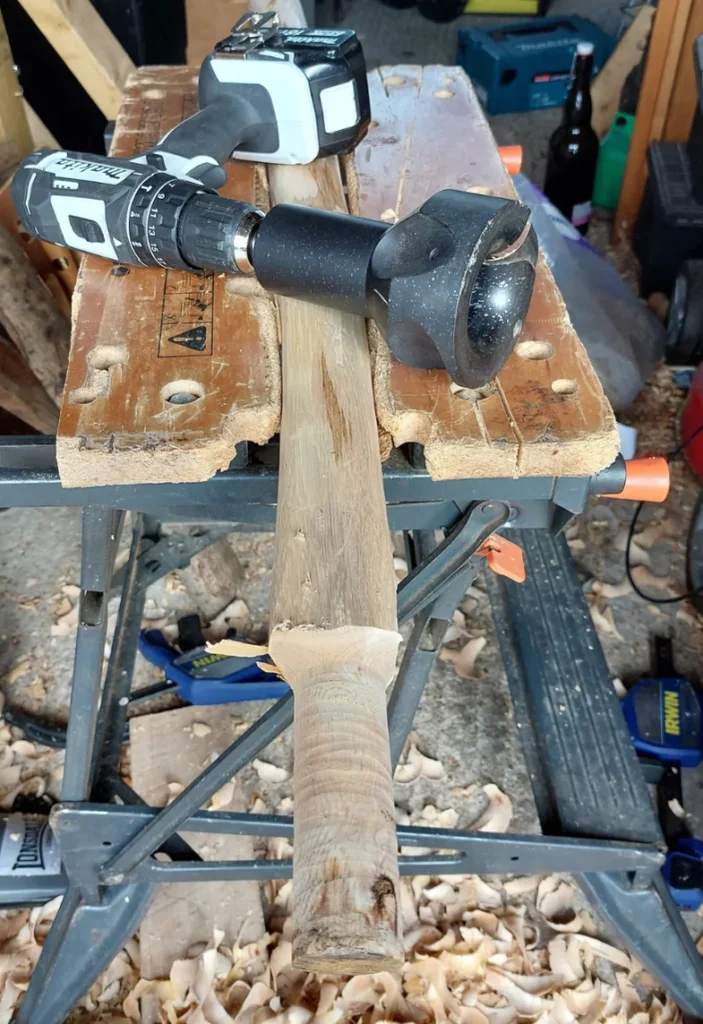
Anyone with a drawknife and shave horse should find making the legs and supports easy. The goal is to have four legs of roughly 1.2m and two bungee supports of about 1.85m. Use the froe and maul to split a suitable log into 6 lengths per the above dimensions. These staves can be shaped into circular legs using the shave horse and drawknife. Finally, use a 1.5″ tenon cutter to put tenons onto the end of each leg and support.
Step 3: Drilling Holes in the Pole Lathe Bed for the Legs and Supports
The lathe bed will hold the 4 legs and 2 bungee supports. There are a few recommendations from my experience of building lathes.
- The legs must be splayed to extend beyond the length and width of the lathe bed. This ensures your lathe doesn’t rock front to back or left to right.
- Don’t drill the holes for the legs too close to the end of the lathe bed – otherwise, your lathe may develop a split from the edge into the hole.
- Allow enough room for the holes for the bungee supports.
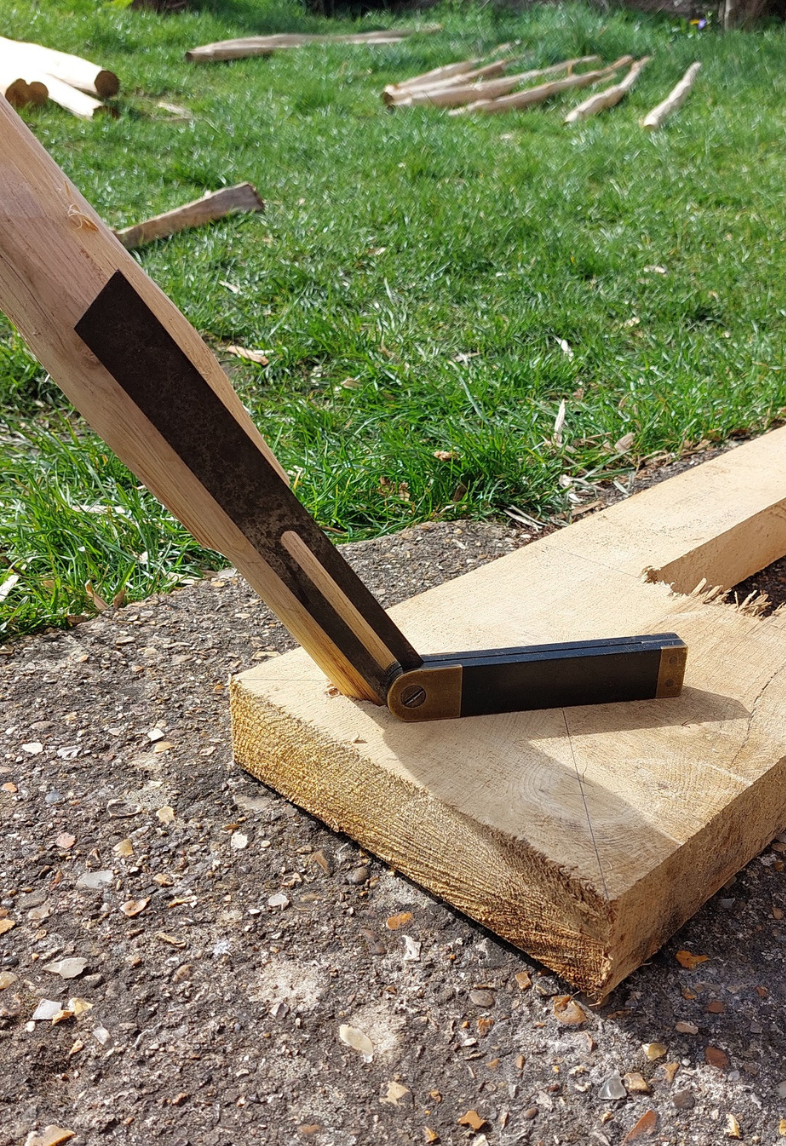
- Use an adjustable bevel to set the angle of the splay.
- The bungee supports should be angled to extend beyond each end of the lathe bed.
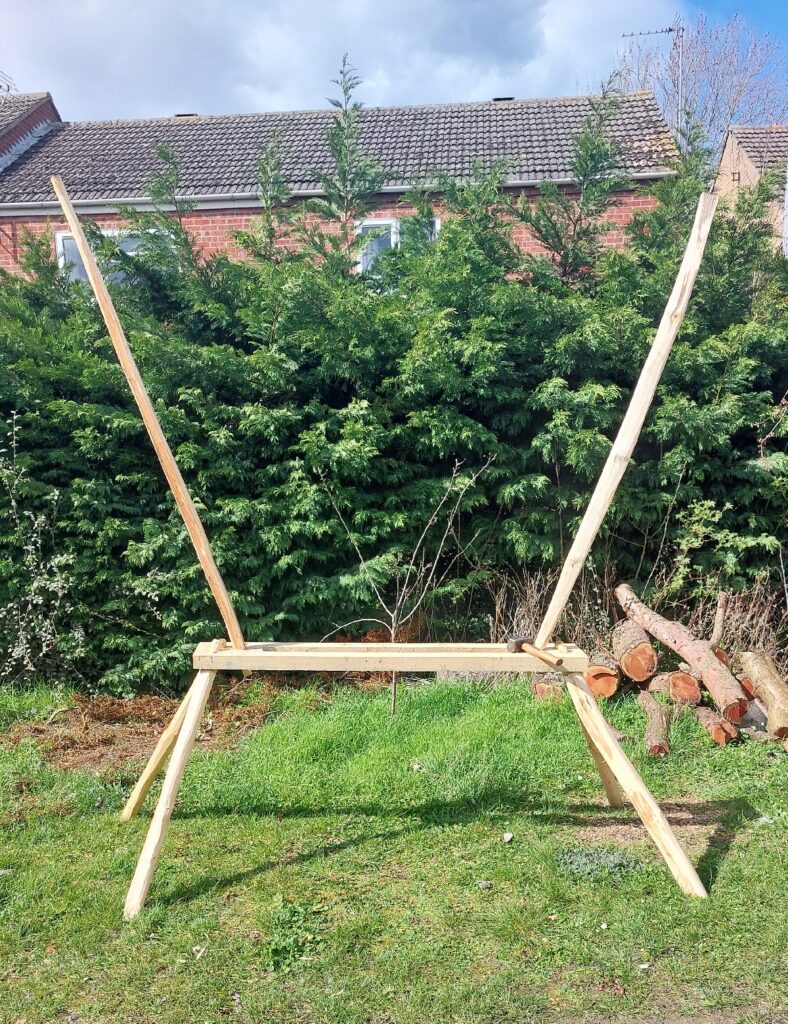
The holes for the legs and supports are drilled through the lathe bed. Once you have completed all of the holes and assembled the parts made, your lathe may look like this.
Tip: It is worth installing two horizontal pegs at the top of each support. The pegs should extend a couple of inches on either side of the support about 4 cm apart. These pegs will ensure the bungee cord stays in place.
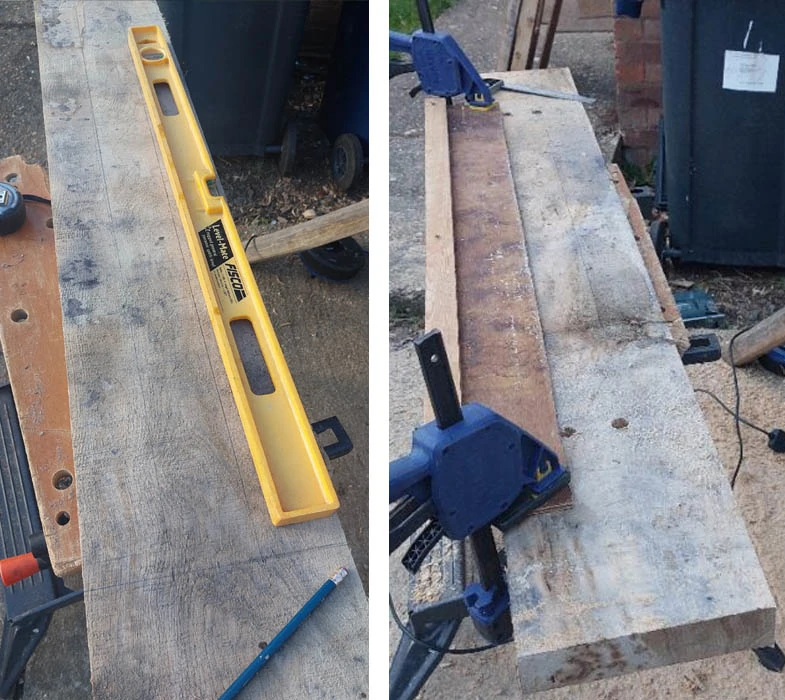
Step 4: Leveling the Pole-lathe
Once you have fitted all of legs it’s time to ensure the bed is horizontal. To do this, set up the lathe on a level surface. Use small offcuts to prop up any leg that is too short. The result is to have the lathe bed supported by all four legs. Using a level, adjust the supports until the lathe bed is level.
Then, it is possible to mark the bottom of each leg using a block and pencil. Tape a horizontal pencil across the top of the block. Then ensuring the block is making solid contact with the ground, draw a line around the end of the leg. This mark is where you will use a handsaw to cut the leg to length.
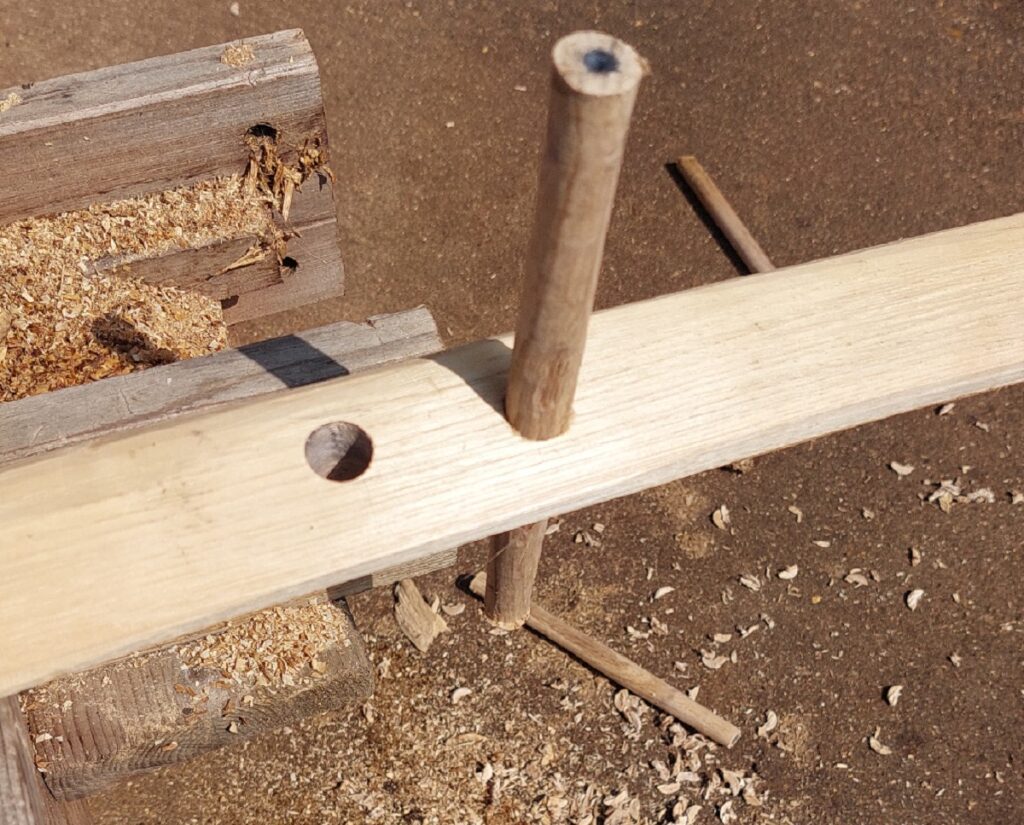
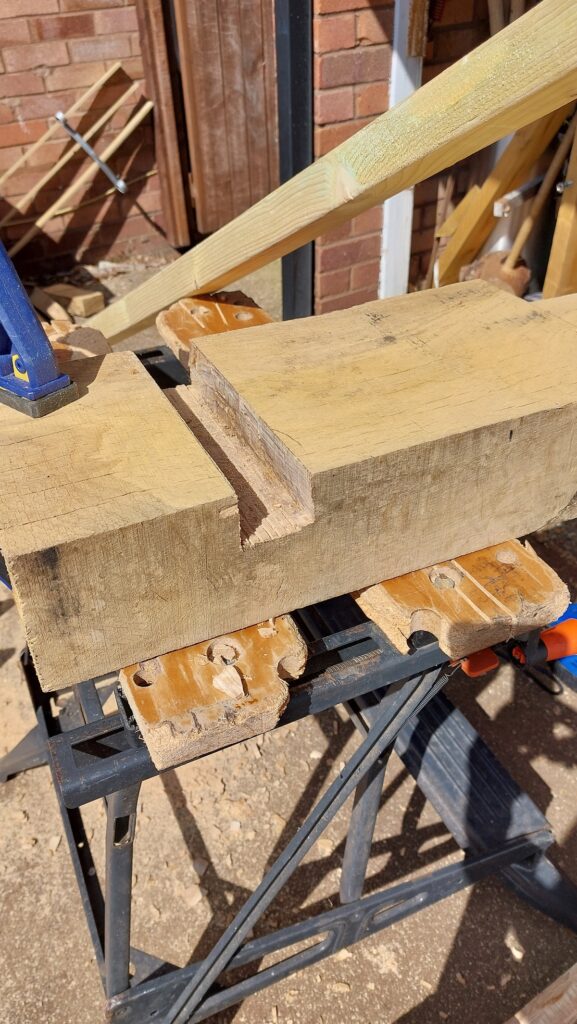
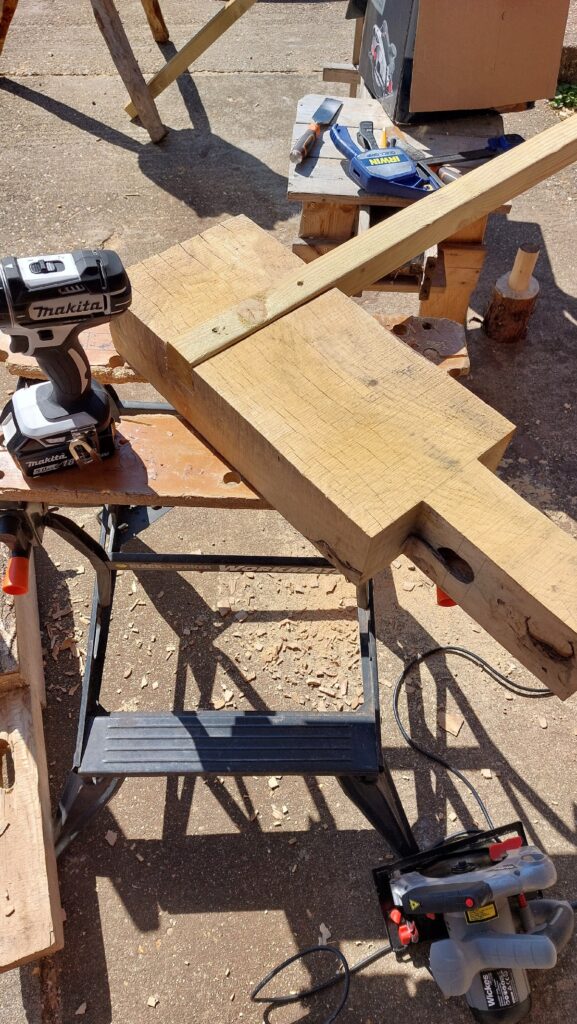
Step 5: Making the Poppets
Once you have the wood for the headstock and tailstock cut to the overall dimensions (listed above), they will need to be shaped to allow the poppets to be installed within the lathe bed slot.
Mark up the headstock and tailstock. The use a handsaw to cut out the tab at the bottom of each poppet. The headstock needs to have 45 cm above the lathe bed and the tailstock needs 30 cm.
Adding the Metal Centers
Tailstock
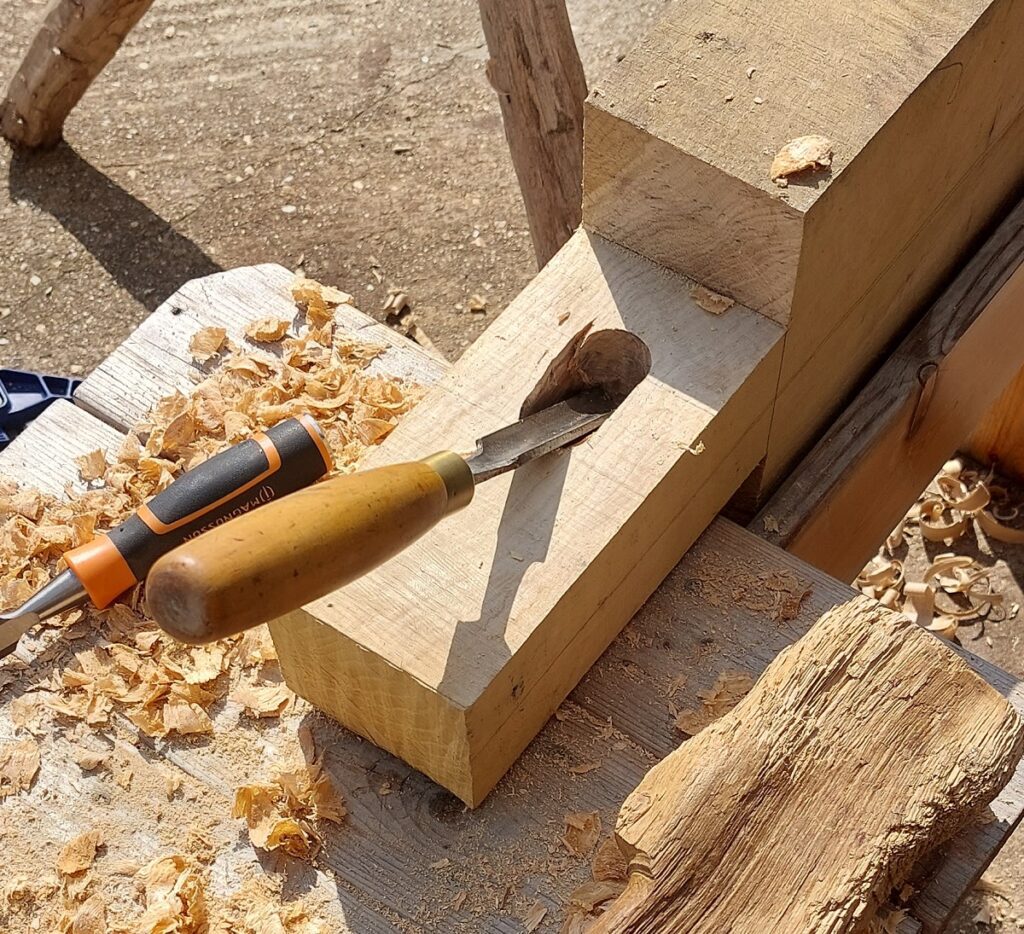
Drill a hole in the top surface of the tailstock, it should be a tight fit so the metal centre won’t move.
Tip: Drill a small hole that intersects at right angles to the hole drilled for the metal centre. This creates a small air vent. This will stop the hydraulic effect caused when you push the metal centre into the hole, especially if you use epoxy to hold everything.
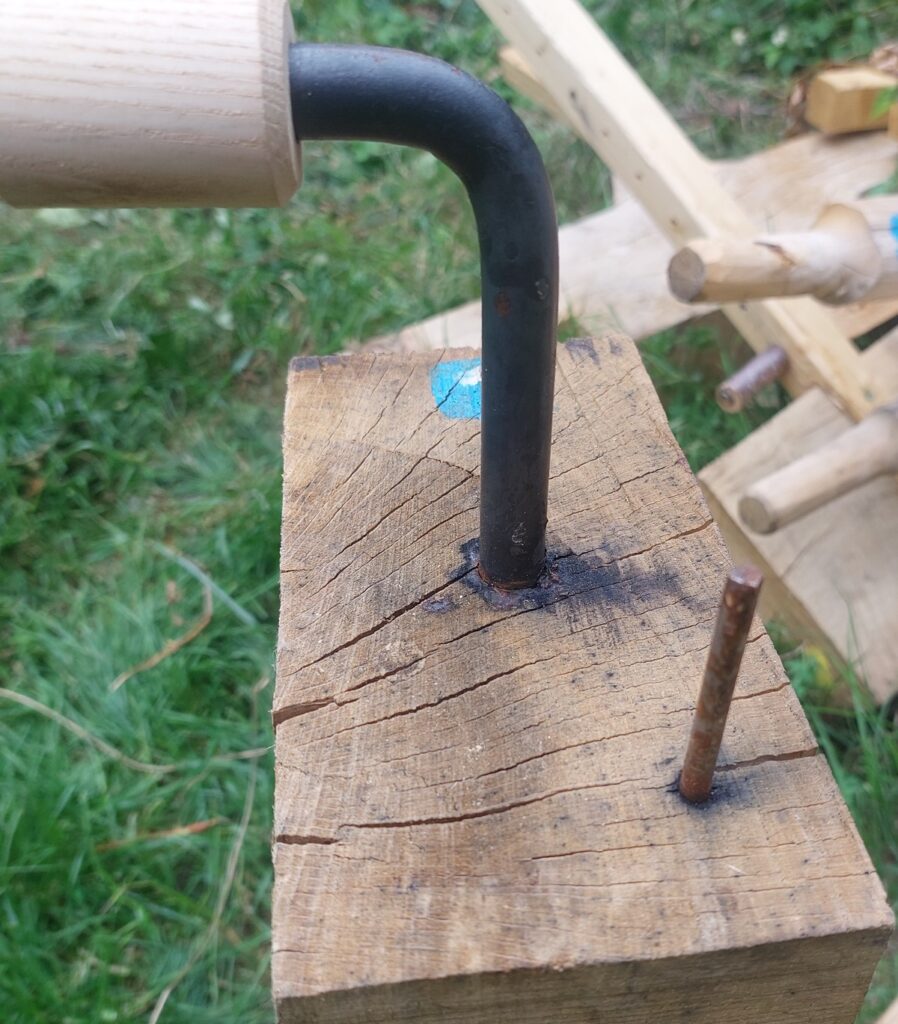
Tool Rest Peg
The tool rest pivots from the tailstock on a metal spike. The spike is a nail banged into the top surface of the tailstock towards the front edge and to the righthand side of the metal centre. See below:
Drill holes for the wedges.
To ensure a firm hold, the top edge of each poppets hole must be above the level where the pole-lathe base will finish. You can opt for a straightforward hole. However, I have drilled two holes in my lathes, one above the other. These are joined using a chisel to form a lozenged shape hole. The bottom edge of the hole is sloped to conform to the wedge shape of the wedges that secure the poppets to the lathe bed.
Headstock
It is possible for you to measure where the headstock metalwork goes. However, I prefer to set up the lathe so I can use the metalwork in the tailstock as a guide to ensure the metalwork is at a consistent height.
Adding the headstock tool rest support.
You can find the tool rest support on the headstock.
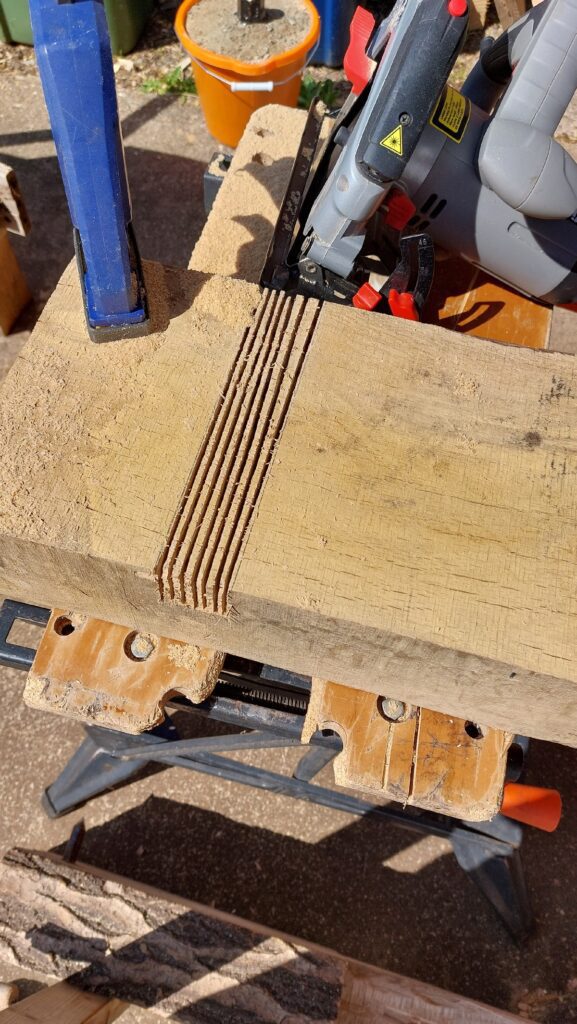
It supports the tool rest, which is fixed to the tailstock, it should be level with the top of the tailstock. The rest should be between 80cm and 1m and made from timber, approximately 4cm x 4cm.
I used a circular saw to make numerous horizontal cuts. You can remove any remaining waste wood with a chisel/bent gouge.

Step 5: Building the Treadle
The treadle can be as simple as a piece of wood, such as a decking plank. Or it can be more complex. These instructions are for the simple decking treadle.
I cut a 1.5 m decking plank. On one end, I drill a single hole, the other two holes parallel to the end of the plank.
You can use the end of the treadle with the single hole to tie down the treadle. The other end holds the lathe’s cord.
Final Tips:
- You can add a stabiliser to the treadle by adding a wooden support that extends from the end of the treadle to the left back leg.
- Use rope to secure the Chromnylon transmission belt to the treadle and bungee.
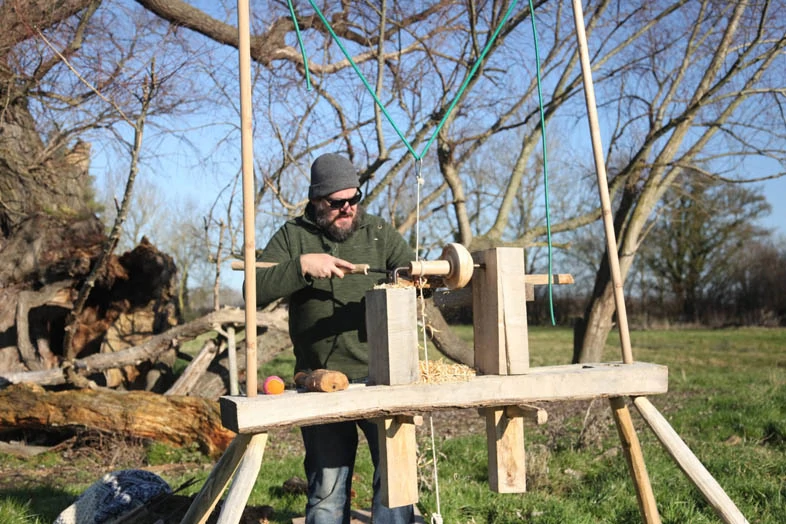
Your lathe should look similar to this:
Now you know how to build a pole-lathe. Remember, building your own tools is not just about saving money, but it’s also about learning new skills, understanding how your tools work and having the satisfaction of knowing that you created something with your own hands.
As a craftsman, I am always excited to share the joy and satisfaction of creating with others. Building a pole-lathe might be a significant project, but the reward is immense – the feeling of turning a piece of wood on a lathe you made yourself is indescribable.
I hope you’ve found this guide useful. Happy turning, and remember: there’s no substitute for a craftsman’s touch!
Jon Baily, owner and craftsman at JB Woodcrafts.
PS, if you liked this guide on How to b Build a Pole-lathe please consider sharing or linking to the article.
That’s a really nice design and article. I like how awesome you explained it. I bought my tools from https://www.timberbits.com/tools/wood-carving-tools/ and i ready for carving.